Creating Personal Memory Boards
We are always inspired by the many ways in which the people we support choose to make a funeral so very personal. This is one of those occasions and we are extremely grateful to Lawrence for allowing us to share the following helpful information about how he created a special ‘Board of Condolence’ for Mary. The following blog is written in Lawrence’s own words.
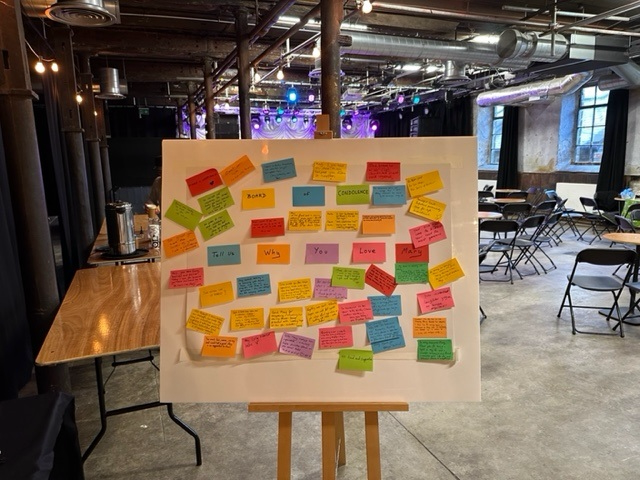
I was very taken with an idea that came up when we were discussing Mary’s funeral to use Post-it notes rather than a book for condolence, particularly as Post-its were an important part of the training business Mary and I ran for the last 12 years. All our training rooms were covered in them.
For a modern funeral celebration Post-its have some obvious benefits: People can write their messages at their own pace, many doing so simultaneously, and take their time reading the other messages while they post theirs on the board. Also, having colourful notes on the tables and the board brightens up the room for funerals that want a ‘splash of colour’, which is how we also chose to describe our dress code.
Tips for anyone wanting to create a similar Board of Condolence
- It is worth using the original branded Post-it® notes and their ‘Super Sticky’ variety. Nobody should have to spend time picking precious memories off the floor.
- Test the surface you are using for your board beforehand. Even Super Sticky Post-its don’t stick well to whiteboards. I taped a large sheet of white card over an otherwise shiny board in advance to avoid disappointing drop-offs.
- Place some Post-its on the board in advance. Nobody likes to be the first on a blank board and your initial notes can help explain everything. At the start our board contained 8 different coloured Post-its which read ‘Board’ ‘of’ ‘Condolence’ ’Tell us’ ‘Why’ ‘You’ ‘Love’ ‘Mary’. After spotting the board on the way in no one needed to be told what to do. We made no announcements. People just picked up a pad and a pen from the tables or at the bar and gave us some lovely memories and messages.
- Provide a big enough board. We received more than enough notes but probably would have had more if my white card had covered the whole board.
- Don’t make it look like the office or a meeting room. We used a simple wooden artist’s easel (slightly less than 6’ high) which fitted our setting far better than a standard flipchart or whiteboard stand.
- Provide lots of decent size Post-its. 76mm x 127mm worked well for us. We had more than enough for our 120 guests with 12 pads of 90 notes, each split in half, spread across 24 tables each with a pen on top. It was all very colourful and lovely to see people feeling inspired by the abundance of notes.
- Give people the right type of pens/markers. Nobody carries the right sort in their jacket or handbag. Ballpoints and rollerballs are fine for normal writing but don’t stand out well enough on Post-its. On Mary’s board everyone wrote their notes with the 1mm line width fibre tipped pens we provided and the results were clear and visually consistent.
- Remember to take photos of the finished board in case notes are lost and the layout is meaningful to you. Better still use the free Post-it® smartphone app (from 3M) to digitise your notes – available from the App Store and Google Play.
I recommend the following or similar notes and pens:
- Post-it Super Sticky Notes Carnival Color Collection, Pack of 6 Pads, 90 Sheets per Pad, 76 mm x 127 mm.
- Post-it Super Sticky Notes Playful Color Collection, Pack of 6 Pads, 90 Sheets per Pad, 76 mm x 127 mm
- Pentel Sign Pen – Black, Packs of 12.
One other idea that really worked well for us was having physical postcard size photographs of Mary on the tables (in addition to a constant digital slideshow in the background on a large screen).
We used small wire card holders, each with two photos back to back. With the pictures standing upright, it felt a little like Mary was at every table and it certainly encouraged people to move around and mingle to see all the old happy-snappies and new digital reprints and that sparked lots of conversations.
